How to use Blu-Ray Ripper for Win
Useful Article
Part 1: How to rip Blu-ray to video
Part 2: How to edit Blu-ray movies
Part 1: How to rip Blu-ray to video
Step 1: Add Blu-ray movies
Insert the Blu-ray disc to the Blu-ray Disc drive or DVD to the DVD-ROM, then click the "Load Disc" button to add videos. Here you can also import DVD folders, ISO files and IFO files to convert.

Step 2: Select an export format and destination folder
Click Profile and select the format you want from the drop-down list. Just below Profile is Output, here you can browse your computer for a better destination folder for Blu-ray Ripper to save your converted movies. As you see, all regular video and audio formats like MP4, MOV, MKV, WMV, AVI, FLV, MP3, WMA, WAV, M4A, etc are provided.
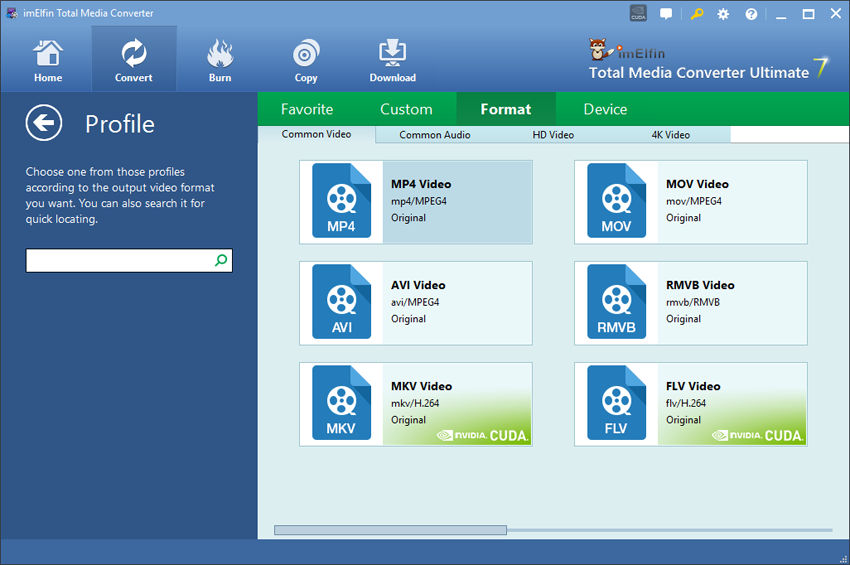
Tips: By clicking the Settings button beside Profile, you can adjust the output video/audio resolution, frame rate, bit rate, etc. to customize the output files to get the best quality you want.
Step 3: Start to rip
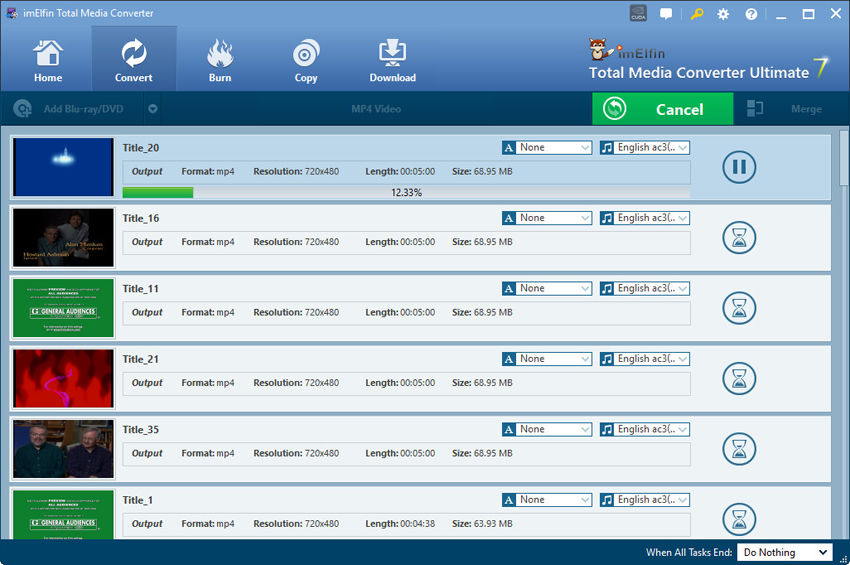
Once you've selected the output file format you want, you're ready to rip. Simply click the Start button to let the software start converting your Blu-ray movies. The ripping time depends on the quality and duration of the output movie. Wait for the conversion to be done and click Find Target to get the converted video files.
Part 2: How to edit Blu-ray movies
Step 1: Convert 2D to 3D
Blu-ray ripper supports to convert and burn plain 2D video to 3D with 6 different 3D effects: Red/Cyan, Red/Blue, Red/Green, Blue/Yellow, Interleaved, Side by Side. You can set it as you like.


Step 2: Edit your Blu-ray movies
After your Blu-ray movies have finished loading, you can use this Blu-ray Ripper to edit, combine and crop your Blu-ray movie. You can access all available editing functions by either clicking Edit or Trim in the menu bar.
Trim video
From the Trim workspace, you can create a custom trim from a larger scene. To adjust the duration of your trim, move the sliders below the screen to the start and end points you want.

Crop video
Here you can drag and move the rectangle on the video to set the crop area or enter the accurate crop values on Left and Top. Meanwhile, you can zoom in or out, change the aspect ratio and rotate videos. In this way, you can remove the black bars of your Blu-ray movies.

Add effect
Click the Effect tab and you'll be able to adjust video brightness, contrast and saturation, apply grey, negative, emboss or old film effects and apply a number of deinterlacing options.

Add watermark
Under Watermark tab, you can import an image watermark or create a text watermark to personalize your video. For a text watermark, select the text watermark circle below the preview screen and type whatever text you want in the blank input field next to it. To change font, simply click the "T" icon to the right of the text input field. You can also adjust the transparency, vertical and horizontal position of your watermark.

Now that you know how it all works, you can start doing more with your favorite movies! Create clips of your favorite scenes and merge them together to make a highlight reel. Edit scenes and upload them to sites like YouTube. No matter what fun stuff you choose to create, now that you've liberated your Blu-ray movies!